Stationery is where tiny details like wax seals and heavy cardstock quietly blow your timeline and your postage budget wide open. One moment you’re admiring a linen-textured envelope, the next you’re at the post office learning what “non-machinable surcharge” means the hard way.
This wedding stationery checklist covers everything made of paper, from save the dates to thank-you cards, with notes on timing, quantities, and assembly so you don’t end up paying rush fees or sending back half your invitations. No signage, no decor, just the paper stuff that actually needs a plan.
1. Build Your Timeline Around Production, Not the Mailbox
Most wedding stationery checklists focus on the mailing date. That’s the finish line, sure, but your production method decides the start line, and skipping this step is exactly how couples end up paying $200 rush fees or downgrading their dream suite to “whatever ships fastest.”
The printing method determines your entire timeline:
- Digital printing: Fast, affordable, and totally workable for tight timelines.
- Foil or thermography: Mid-range lead time. Extra proofing rounds and specialized finishing steps are baked in.
- Letterpress and hand finishes: Custom wax seals, edge painting, calligraphy? You’re in it for the long haul. Start earlier than you think.
Before you even talk to a designer, nail down your guest count range and decide on your envelope format. Square envelopes cost more to mail because the post office considers them “non-machinable.” More on that in a minute. If sustainability matters to you, source FSC-certified or recycled stocks now, before they go on backorder.
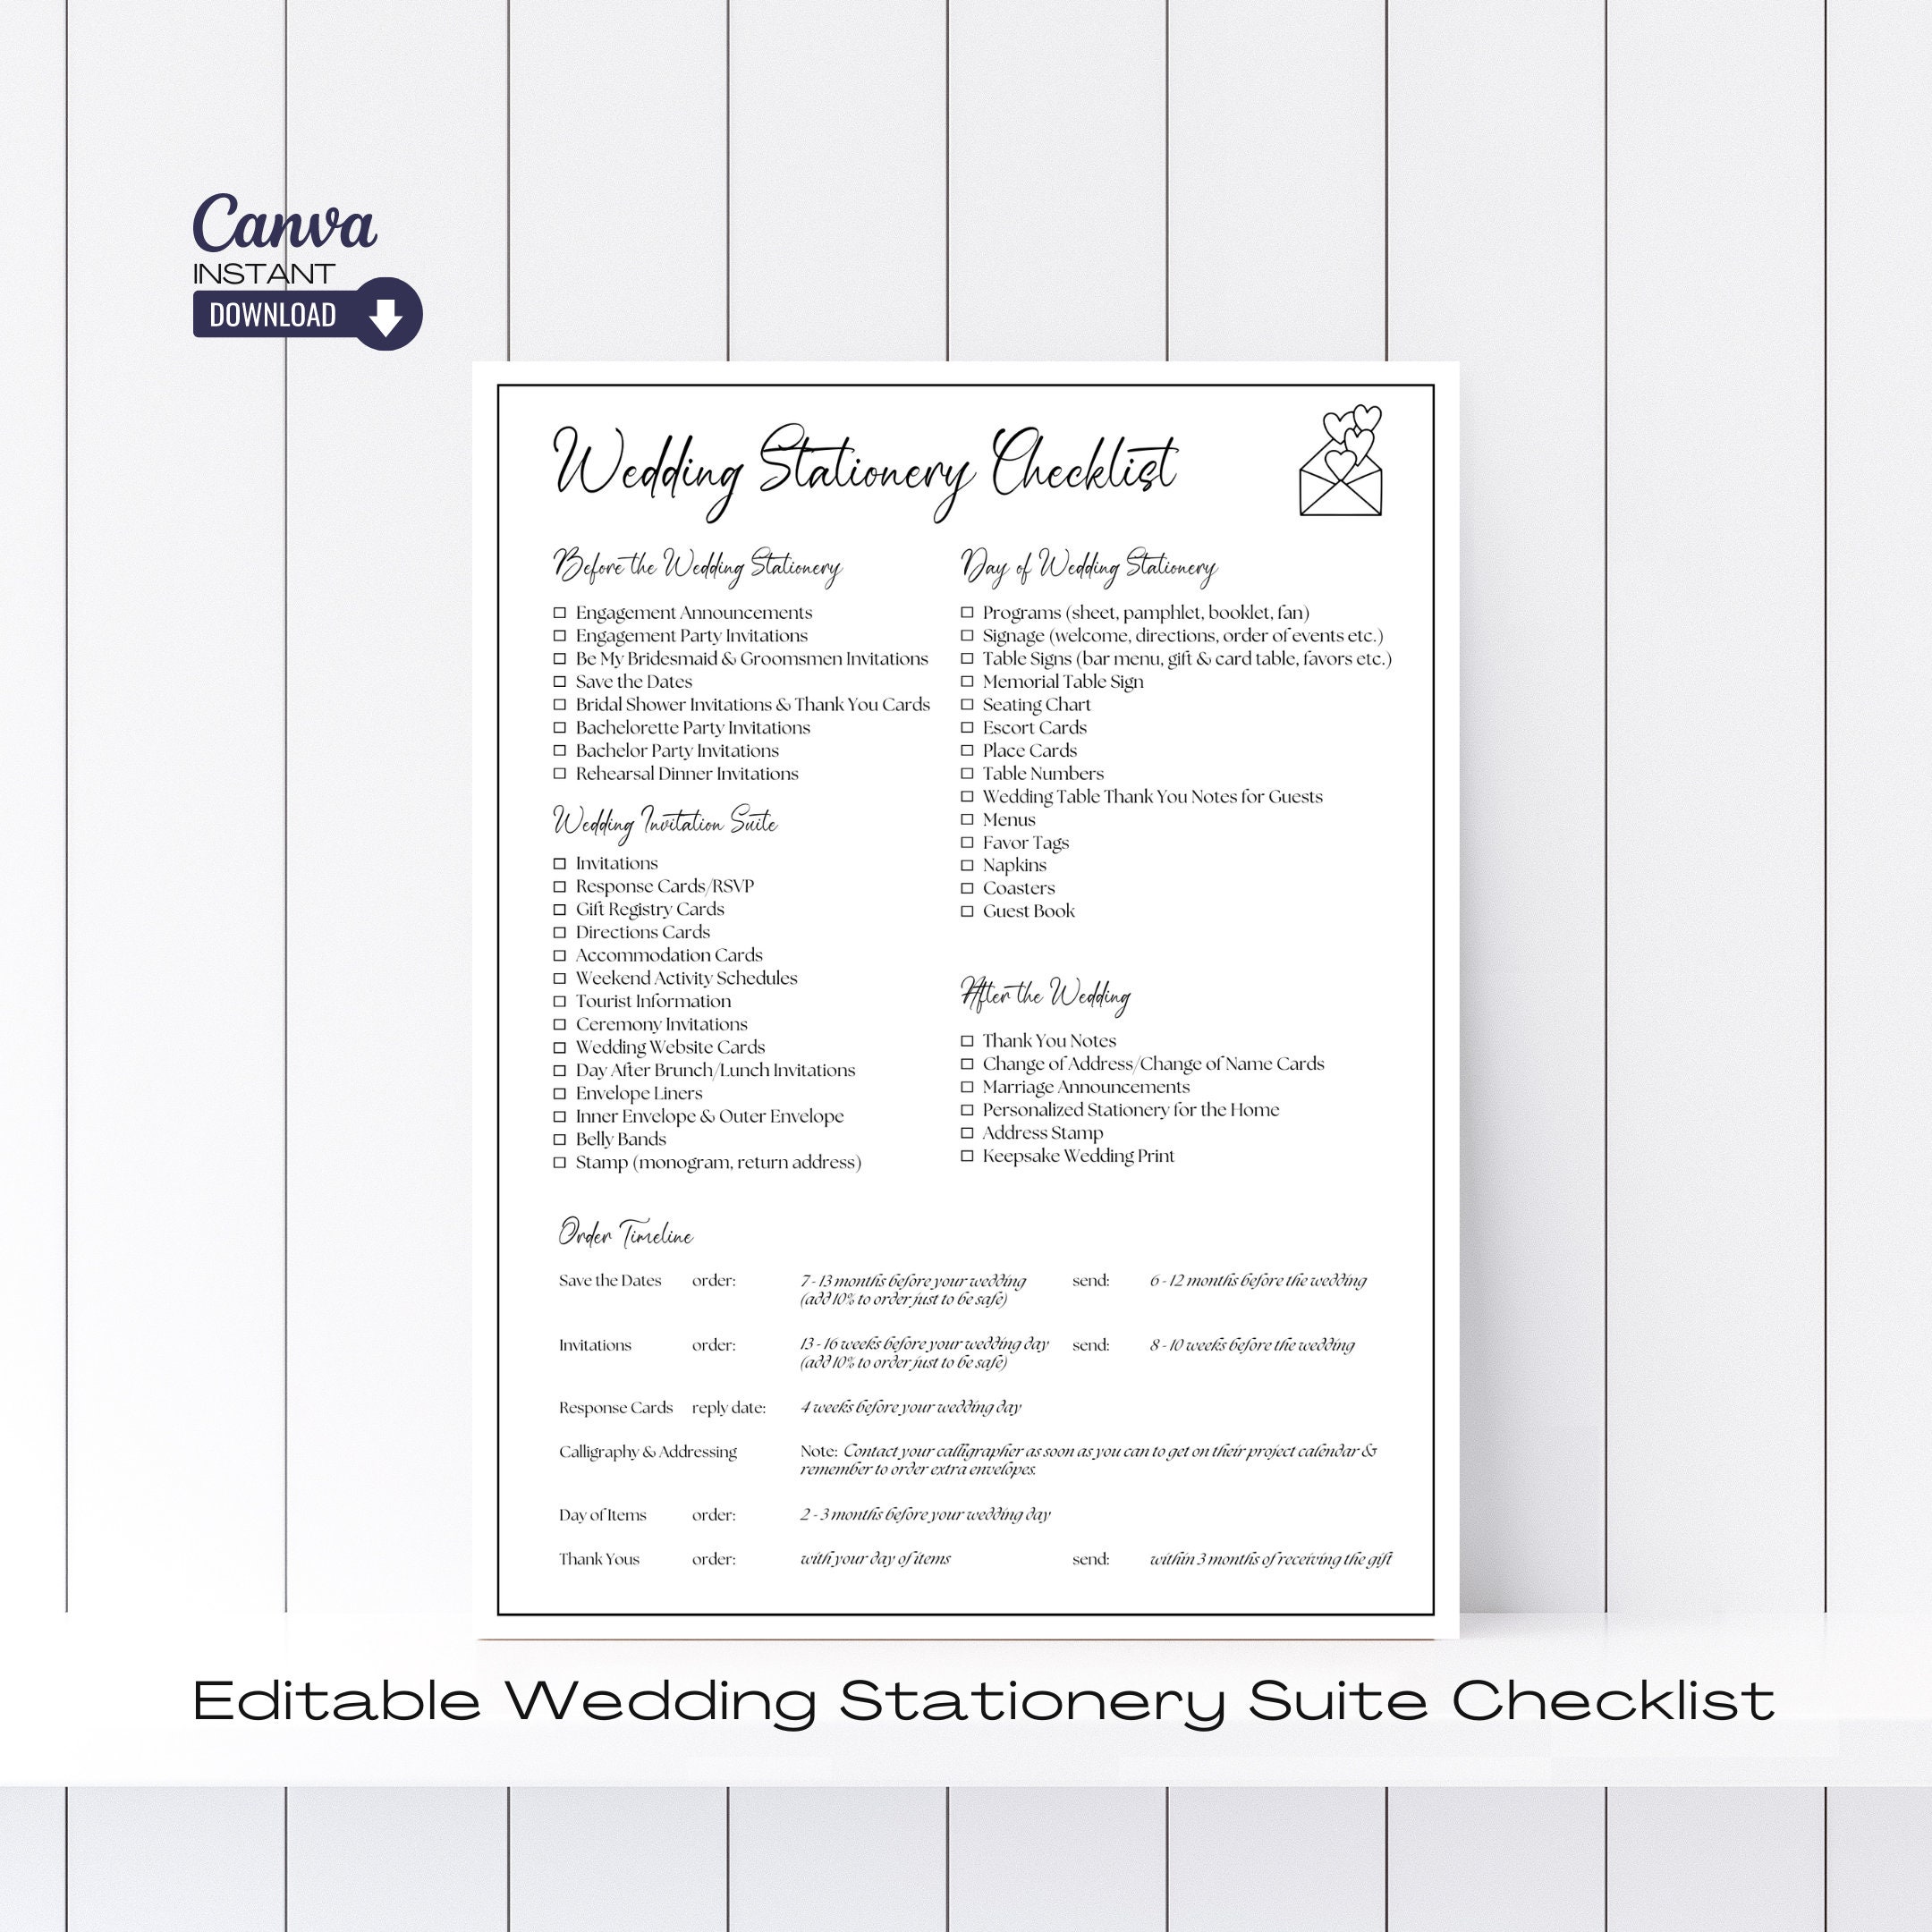
Customizable Wedding Stationery Checklist
2. Save the Dates: Do You Actually Need Them?
Short answer: it depends. For a destination wedding or a holiday weekend, yes, absolutely, non-negotiable. Your out-of-town guests need that heads-up to grab flights before prices get ugly. For a local Saturday wedding with mostly nearby guests? They’re a nice touch, not a requirement.
If you’re sending them, keep it simple. You only need:
- Your names and the wedding date
- City and region
- Wedding website URL
- The phrase “Invitation to follow”
Skip the ceremony time and anything else that belongs on the actual invitation. Order one per household, not per person, and grab ten extras for keepsakes and that one cousin whose mail mysteriously disappears. Send early enough to give everyone time to make travel arrangements.
3. Change the Date Cards: Handle It with Grace
Your dream venue double-booked. Your perfect date shifted. It’s a headache, especially once save-the-dates are already living on refrigerators across three states. But you can handle this without sending a novel-length apology to 150 people.
Keep the card calm and factual:
- The new date and city
- The venue name, if confirmed
- A link to your wedding website for the latest details
Update your website before the cards go out so guests have one source of truth the moment they open the envelope. Order enough for every household you originally notified, plus a few extras. Then keep moving forward.

4. Engagement Announcements: The Classy Cousin of the Instagram Post
Think of these as the paper-based alternative to the “I said yes!” story that expires in 24 hours. They signal a formal announcement rather than a logistical notice, and they’re perfect for long engagements or for family members (hi, Great Aunt Mildred) who genuinely refuse to join social media.
What to include: your names, a photo, a simple announcement line, and a return address so people know where to send celebratory gifts. What to leave out: RSVP info, the venue, the timeline, and honestly the city isn’t even necessary yet. Only send these to people you genuinely want to inform. Printing a card for your dentist is a waste of stamps.
5. Pre-Wedding Event Invites: A Quick Ownership Chat First
Before anyone orders a single bridal shower invitation, have a quick conversation about who’s actually responsible for what. The general rule: whoever hosts the party handles the paper. Your Maid of Honor owns the bachelorette invites. Your in-laws typically manage the rehearsal dinner stationery. If you’re hosting the engagement party yourselves, that one’s on your plate.
Pre-wedding events that usually need their own invitations:
- Engagement parties
- Bridal showers
- Bach or stag weekends (digital is completely fine here)
- Rehearsal dinners
Every invite needs the basics: who, what, when, where, and a clear RSVP method. Always include the dress code. Nobody wants to show up in a sundress when everyone else is in cocktail attire, and that panicked “wait, what are we wearing?” text always comes in at 9pm the night before. These don’t need to match your wedding suite perfectly. Think of them as the fun, younger siblings: same family, slightly different vibe. Order enough for every household, plus five extras.
6. The Main Invitation: The Star of Your Wedding Stationery Checklist
Your main invitation card is not a storage unit for every logistical detail. It’s the star of the suite. Treat it that way.
What Stays on the Card
Less is genuinely more here. Stick to these essentials and your design will be legible, elegant, and not overwhelming:
- Host names, if applicable
- The couple’s names
- Date and start time
- Venue name, city, and state
Hotel blocks, registry links, and multi-day schedules belong on an insert card or your wedding website. Cramming everything onto the main card confuses guests about what’s actually important and tends to look cluttered regardless of how gorgeous the design is.
A Note on Format and Postage
Standard rectangles are the most budget-friendly format to mail. Thick cardstock and wax seals look stunning, but they often trigger extra postage or non-machinable surcharges. Assemble one complete sample suite and take it to the post office for a weigh-in before you buy a single stamp. Do this before ordering in bulk.
Getting the Numbers Right
Order based on households, not total guest count. Add 15 extra suites for keepsakes, vendor flat-lays, and those inevitable moments where the pen slips at the worst possible time.
7. The RSVP Card: Your Guest Count Lifeline
Without a clear RSVP system, you will spend your final pre-wedding week hunting down responses from people who “definitely planned to reply soon.” The RSVP card protects your sanity, your caterer’s timeline, and your final seating chart.
What to include on every RSVP card:
- A reply-by deadline that gives your caterer enough runway
- A name line (the classic “M_________” works) for guests to list who’s attending
- Accepts or declines checkboxes, kept simple
- Meal choices and a space for dietary restrictions
- A song request line, because guests actually love this
If you’re going digital, give the URL its own small card rather than cramming a website link onto the formal invitation. It looks cleaner and reads as intentional. For traditional mail RSVPs, pre-address and pre-stamp the return envelopes. It’s a small courtesy that dramatically improves your response rate.
8. Insert Cards: The Art of the Selective Edit
Open a wedding invitation that looks like a CVS receipt and you’ll immediately understand why insert discipline matters. The goal is a clean suite that still gives guests everything they need to show up in the right shoes.
Only print the logistical heavy hitters:
- Accommodations: Hotel block codes and booking deadlines
- Transportation: Shuttle departure times or “don’t trust GPS on this one” warnings
- Weekend Schedule: Essential for multi-day weddings
- Dress Code: If it’s black-tie or “festive,” it needs to be in writing
Skip registry links and five-paragraph FAQs. That information lives on your website. Be strategic with assembly too: only tuck hotel cards into envelopes going to out-of-town guests. Your local guests don’t need a map to the Marriott they drive past every day.
9. Reception Cards: When “Dinner to Follow” Isn’t Enough
If your ceremony and reception are in the same location, you probably don’t need a separate reception card. If they’re at different venues, start much later, or the guest lists don’t match, you do. This insert prevents the awkward “wait, where are we going now?” confusion from the back pew.
Keep it tight:
- Reception location and start time
- Dress code, if it differs from the ceremony
- A transportation note or your wedding website link
Skip printed directions. Nobody is unfolding a paper map in 2026. Only order enough cards for the guest subset that actually needs the information.
10. Website and Registry Cards: Navigating the Etiquette Gap
Nothing kills an elegant invitation suite faster than making it look like a shopping flyer. Registry talk is always a little awkward on paper, but enclosure cards solve the tension without the cringe.
The Website Card
This is your logistical catch-all and honestly the smartest insert in your entire envelope. It consolidates travel info, schedules, and RSVP links while keeping the main invitation looking like the art piece it is. Use the phrase “For details, travel, and registry, visit…” rather than listing store names. For guests who hate typing URLs, add a subtle QR code or a shortened link. Website cards belong in every suite; registry inserts are optional and can be used selectively depending on which family members have more traditional expectations.
11. Envelopes and Addressing: More Than Just a Paper Bag
You spent weeks obsessing over the cardstock. Don’t let envelopes become the afterthought that quietly eats your budget or tanks your first impression at the mailbox.
The Essential Layers
- Outer envelope: Your mandatory mailing vessel
- RSVP envelope: Essential for mail-in replies. Pre-stamp these for your guests, always.
- Inner envelope: Optional, but useful for formally listing every invited guest by name
Addressing Options
- Digital printing: Fast, matches your invitation fonts, clean look
- Labels: Budget-friendly for casual vibes
- Hand calligraphy: Timeless and stunning, but book those pros months in advance
Don’t forget the return address on the back flap. A custom stamp or printed text both work beautifully. If you want to add an envelope liner for a pop of pattern, weigh the finished suite at the post office first. Extra paper often means extra postage. Order 20% more envelopes than you think you need to account for addressing mistakes, and always test your ink on dark envelopes before committing. Low-contrast ink is a postal disaster waiting to happen.
12. The Post Office Audit: Do This Before You Buy Stamps
Spending an entire afternoon hand-stamping invitations only to find a “return to sender” sticker on a pile of them is a very specific kind of wedding planning heartbreak. Avoid it entirely by doing one simple thing first.
Assemble one complete prototype of your final suite. Include every single piece: the liner, RSVP card, belly band, wax seal, twine, all of it. Take it to the post office and have it professionally weighed before you buy a single stamp.
Watch Out for the “Cute Tax”
The USPS is not always impressed by your Pinterest aesthetic. Certain features trigger non-machinable surcharges because they physically cannot pass through standard sorting rollers:
- Square envelopes
- Wax seals or bulky knots that create uneven surfaces
- Rigid cardstock that won’t bend
- Oversized formats
Ask the postal clerk whether you need a regular stamp, a surcharge, or hand-canceling to protect delicate seals. Add these costs to your stationery budget early. A $300 surprise at the counter is not the vibe.
13. Mailing Day Toolkit: Speed, Sanity, and Zero Sticky Tongues
Three hours of envelope-licking only to realize the RSVP cards are still sitting on the kitchen table is how a fun DIY afternoon becomes a very different kind of evening. Set yourself up properly.
Your mailing day essentials:
- Bone folder: Crisp, professional creases every time
- Glue dots or double-sided tape: No soggy, yellowing mess from liquid glue
- Envelope moistener: Your tongue deserves a better Saturday
- Postage scale: Eliminates all guessing games
- Sorting tray: Keeps suites organized and smudge-free while you work
Pre-sort all your pieces and assemble in the same order every single time to build speed. Run a 10-suite test batch before committing to the full run to catch any layout issues early. Verify the wedding URL and postage one more time before you seal. Then send.
14. Ceremony Programs: Give Your Guests a Roadmap
For religious ceremonies, multi-part ceremonies, or large weddings where guests won’t recognize everyone in the wedding party, a program is a genuine gift. It helps people follow along, feel included, and know when it’s finally time for cocktails.
What to include:
- Ceremony order and key participants
- Readings or music lyrics your guests will be expected to follow along with
- An unplugged ceremony note if you’re enforcing a no-phone policy
You rarely need a 1:1 program-to-guest ratio. If guests grab them from a basket at the entrance, 70% of your headcount is plenty because couples almost always share. Only order for the full headcount if you’re placing one on every seat. Match your invitation suite vibe, but prioritize legibility over beauty here. That delicate script font that looks gorgeous on screen needs to be readable in a dimly lit church.
15. Escort Cards vs. Place Cards: Let’s Settle This Once and For All
These two terms get used interchangeably constantly, and they do completely different jobs. An escort card tells your guest which table to find. A place card sits at the actual table and tells them which specific seat is theirs. Think of the escort card as the GPS to the neighborhood; the place card is the key to the front door.
Choose based on your seating plan:
- Assigned tables only: Escort cards at the entrance are all you need
- Assigned seats: You’ll need escort cards to get guests to the table and place cards to seat them
- Plated meals: Place cards double as meal identifiers. Use subtle icons for each option so servers know who ordered the salmon.
Plan for one card per guest, though one escort card per couple can save on printing. Alphabetize your escort card display by last name. It prevents a bottleneck at the entrance and gets everyone to the bar faster, which is genuinely appreciated by all.
16. Tabletop Stationery: The Coordinated Finishing Touch
You spent a lot on the decor. Tabletop paper is what ties it to your invitation suite and makes everything feel intentional rather than assembled the week before the wedding.
For menus: one per guest is the luxury move for plated dinners. Two per table is a perfectly smart budget play. Table numbers need large fonts and double-sided cards so guests can spot their table from any direction, not just from one angle.
Small extras worth adding to your wedding stationery checklist:
- Mini bar cards to showcase signature cocktails
- Slim place-setting menus tucked into napkins
- Table names as a personal alternative to standard numbers
The fastest way to make everything look cohesive: use the same fonts and paper finish as your main invitation suite. Instant polish, minimal effort.
17. Favors and Welcome Stationery: Small but Mighty
A favor without any explanation is just a mysterious object on a table. A thoughtful tag turns it into a keepsake guests actually understand and want to take home.
Favor tags and labels: Keep it to the essentials: your names, the date, or a short thank-you line. Custom stickers work for flat surfaces like jars and boxes. Hang tags are better for anything involving a ribbon or a bottleneck.
Place-setting thank-you notes: Optional, but they punch well above their weight emotionally. For large weddings, a pre-printed message with hand-written guest names is a completely reasonable middle ground. For micro-weddings, a fully handwritten note is the gold-standard move.
Welcome bags: If you’re providing hotel welcome bags, include a note with the Wi-Fi password, hotel info, a brief weekend schedule, and a warm greeting. Guests remember this.
Batch-print these items alongside your ceremony programs to cut setup fees and ensure your paper stock matches perfectly. It’s the easiest way to make the extras look intentional.
18. Guest Books and Advice Cards: Actually Capture the Memories
A traditional leather-bound book left on a table by the exit will gather exactly zero entries. Placement and format matter more than most couples expect.
Three things to get right:
- Format: A classic bound book works, but individual advice cards are easier to store and genuinely lovely to read on the honeymoon
- Tools: Test your pens before the wedding day. Include a simple prompt like “Share a favorite memory” to get people writing instead of staring blankly at an empty page
- Location: Cocktail hour, not the exit. Guests linger during cocktails. By late-night dancing, nobody is stopping to write anything heartfelt.
For keepsakes that actually hold up, choose archival paper and acid-free ink. You’ll thank us in twenty years when those sweet messages haven’t faded into oblivion.
19. Thank-You Cards: The Final Leg
Your honeymoon tan is fading. There’s a mountain of boxes. The thank-you card marathon is officially real, and it comes in two waves: bridal shower thank-yous and wedding thank-yous.
The move that saves you the most stress: order both sets with your main invitation suite. You’ll get a design match without any frantic reordering, and future-you will be deeply grateful. Count your gift-givers and add 20%. You’ll need buffer for late arrivals and the neighbor who sends a check three months after the fact.
Track gifts as they arrive with a simple spreadsheet. Your post-wedding brain will not be reliable for this task. Use writable cardstock, not high-gloss. Gloss finishes cause ink to smear, and a smeared thank-you note is a sad thing to send someone who bought you a stand mixer.
How to Build Your Wedding Stationery Action Plan
You now know everything that potentially goes into a wedding stationery suite. Here’s how to turn all of it into a concrete plan that doesn’t collapse the moment you add a wax seal.
Step 1: Define Your Wedding Type First
Before you fall in love with a specific shade of sage green, define what you’re actually hosting. A local one-day wedding has completely different paper needs than a three-day destination weekend or a multi-event cultural celebration.
Audit your events. List every gathering you’re actually hosting. Label which items are required for guest logistics and which are purely decorative. Don’t let Pinterest bully you into printing brunch cards for a Sunday morning you plan to sleep through. You’ll end this step with a lean, personalized list of every piece of paper you actually need, from save the dates through the final thank-you note.
Step 2: Build Your Required Core Three
Every wedding needs an invitation, an RSVP system, and a details strategy. These three are non-negotiable. Everything else on this checklist is a judgment call based on your wedding type, guest list, and budget. Assess how tech-comfortable your actual guest list is before deciding what to print versus what to put on the website. Be honest about what you can manage. If you hate opening mail, a digital RSVP system is your best friend.
Step 3: Work Backward from Your Mailing Date
Production lead times are the silent killers of stationery timelines. Budget at least two weeks for proofing alone. Check your production method’s lead time: digital printing takes a few days; letterpress and foil can take several weeks. Allow ten days for addressing and assembly. Build in a firm “order by” date that accounts for all of this, plus shipping and the occasional printer delay.
Step 4: Do a One-Suite Mailability Test
Before you buy a single stamp, assemble one complete final suite, everything included, and take it to the post office for a professional weigh-in. Ask specifically about non-machinable surcharges. You’ll leave with a precise postage cost per envelope and a clear-eyed final decision about which design elements are worth the extra cost.
Step 5: Do a Sustainability Reality Check
If eco-friendly choices matter to you, don’t take “recycled” at face value. Ask your stationer for FSC certification specifics or post-consumer waste percentages. Certain finishes, heavy metallic foils and plastic-based coatings especially, can make paper difficult to recycle regardless of the base stock. Ask about ink too: soy-based or vegetable-based inks are a meaningful upgrade from petroleum-based options.
Step 6: Order Quantities Like a Rational Human
Order per household, not per guest, then add 20%. Build a buffer of 15 to 20 extra suites for keepsakes, flat-lay photography, and last-minute additions. Order ceremony programs for about 70% of your guest count since couples share. Place cards stay at a strict one-per-guest ratio. This prevents expensive reprints while avoiding a stack of wasted paper.
That’s the whole game. You now have a personalized stationery plan and a timeline with actual structural integrity.
Wedding Stationery Checklist: Frequently Asked Questions
A few questions that come up constantly when couples are working through their wedding stationery checklist for the first time.
Do square envelopes always require extra postage?
Yes. Because square envelopes can’t pass through standard postal sorting machines, the USPS classifies them as non-machinable and adds an automatic surcharge regardless of weight. Always take one fully assembled suite to the post office for a weigh-in before you commit to stamps.
How many invitations should I order?
Order per household, not per guest, which usually cuts your total count roughly in half. Then add a buffer of 15 to 20 extra suites for keepsakes, photographer flat-lays, and the last-minute guest additions that will definitely happen. Reprints are expensive. Order more than you think you need the first time.
Do I need an inner envelope?
Nope, it’s optional. Inner envelopes were traditionally used to list every specific invited guest by name to avoid any confusion. In a modern context, they add cost and weight without being necessary unless you’re hosting a strictly formal affair. Just make sure your outer envelope is very clear about exactly who’s invited.
Can I skip insert cards and put everything on a wedding website?
For most couples, yes. A simple website card with your URL handles the bulk of logistics beautifully, and it’s easier to update as details shift. The exception: if your guest list includes older relatives who genuinely struggle with technology, a physical insert for the most critical information is a kind gesture worth the printing cost.
What stationery can I print per table instead of per guest?
Menus (two to three per table is completely appropriate), table numbers, and bar cards are all per-table items. The one hard rule: place cards must be per guest if you’re assigning specific seats. Everything else can be shared without it looking like a budget cut, because genuinely nobody is counting.