In this article I will discuss how to use Vistaprint for wedding stationery, including a site walk-through from start to finish. This beginner’s guide will show you how to create an account with Vistaprint, upload PDF images, and make sure your Love & Lavender wedding invitation, RSVP, or other printable look great.
Consider using an online printing company if you don’t have the time to print your wedding stationery at home. You gain more free time for planning your wedding and making other great DIY projects – yay!
Let’s get started.
Create an Account with Vistaprint
I have used Vistaprint for a few projects, and I know it can be overwhelming the first time you create an account and finally click the buy button on your stationery product.
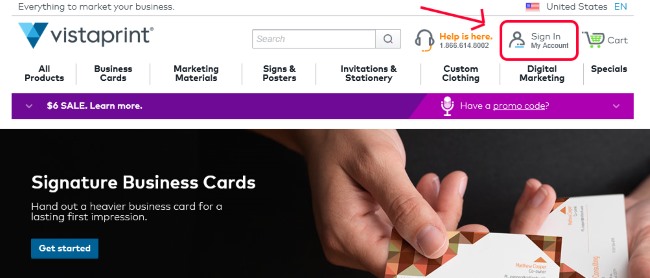
To get started creating a new account click the button labelled “Sign In/My Account” at the top of Vistaprint’s website.
Fill in the standard form fields like email, first and last name, and choose a secure password.
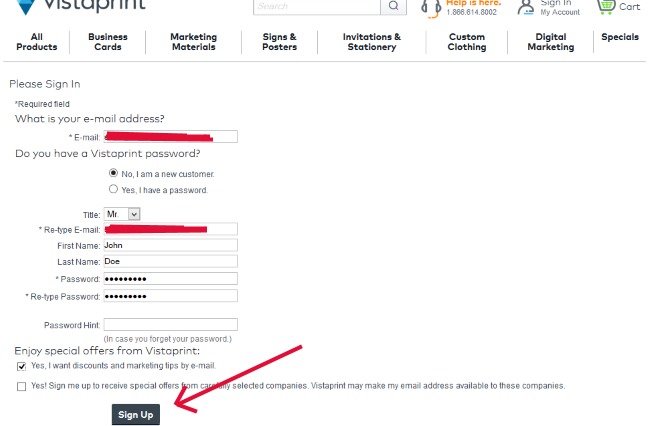
You will notice the option ‘Yes, I want discounts and marketing tips by e-mail.’ I suggest leaving it checked, or if you uncheck the box a new option will appear that says ‘receive emails once a week‘. Some companies can overwhelm your email inbox with offers, so once a week may be more appropriate. Either way, it is a good way to receive the latest discounts directly in your inbox.
Click the Sign Up button and you are on your way. You will immediately be taken to your account page – the hub for navigating around Vistaprint.
Upload a PDF File to Vistaprint
You should have already created a printable using one of our online forms or downloadable PDF files. Perhaps you have a PDF file that bought somewhere else online or were able to find for free. In any case, remember where you stored this design file on your computer because you will need to access it for this step.
In this example, we are going to upload the Love & Lavender silhouette wedding invitation sized at 5 x 7 inches.
(click through the slideshow below)
[layerslider id=”4″]
Steps Corresponding to Slides Above:
- Navigate to the Invitations & Stationery tab and click on Wedding Invitations.
- Scroll Down to wedding invitations and click Get Started.
- Click Use your complete design and click the radio button 5×7 Flat.
- This will bring up a layout option. In most cases you will choose vertical layout and click continue.
- To upload your image click the Browse button
- Navigate to the folder where you saved your PDF file and select the file. Click Open.
That’s it! You should see the words Upload Complete – Your image resolution is excellent.
Click on the button labelled NEXT in order to proceed to the customization screen.
[av_hr class=’short’ height=’50’ shadow=’no-shadow’ position=’center’ custom_border=’av-border-thin’ custom_width=’50px’ custom_border_color=” custom_margin_top=’30px’ custom_margin_bottom=’30px’ icon_select=’yes’ custom_icon_color=” icon=’ue808′ font=’entypo-fontello’ av_uid=’av-2yfz8nb’ custom_class=” admin_preview_bg=”]
Customize Your Printable
[av_hr class=’short’ height=’50’ shadow=’no-shadow’ position=’center’ custom_border=’av-border-thin’ custom_width=’50px’ custom_border_color=” custom_margin_top=’30px’ custom_margin_bottom=’30px’ icon_select=’yes’ custom_icon_color=” icon=’ue808′ font=’entypo-fontello’ av_uid=’av-2g27xrb’ custom_class=” admin_preview_bg=”]
I sometimes forget that not everyone is as familiar with online editing tools. That’s why I want to try and make it as simple as possible for you to follow along step-by-step as I go through the editing process. Let’s see how we can make sure you get the right quality from your Vistaprint product.
At this point you should see the customization screen below, with your printable design in the middle of the screen and common editing functions (basic, text, insert, advanced) above the design.
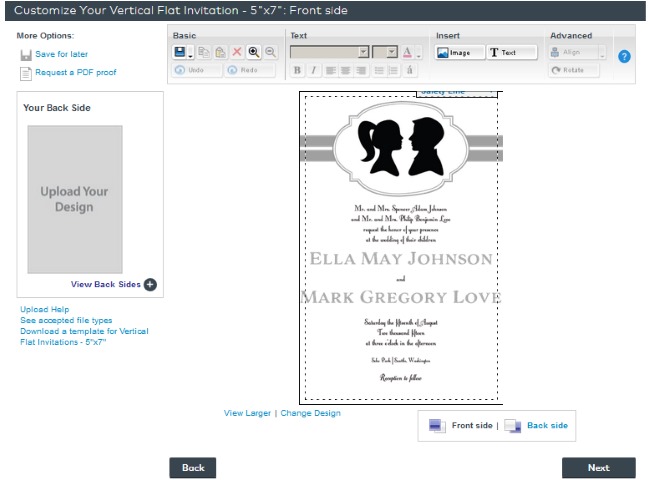
We will explore the additional ‘request a proof’ option in the next section.
First, let’s look at what we need to do to ensure our printable is correct.
Notice the dotted line on the inside of the example silhouette image above – that is called the safety line. When Vistaprint goes to print and cut your final invitations, they want to make sure that nothing important is OUTSIDE this line. In our case, the letters M and E from the groom’s name falls outside the dotted line.
What should we do? We need to slightly crop the image so that it falls with the margin of error for cutting. Hover your mouse over the image and a new tool box will appear. Click on Crop/Rotate to bring up the Crop/Rotate dialog box as pictured below.
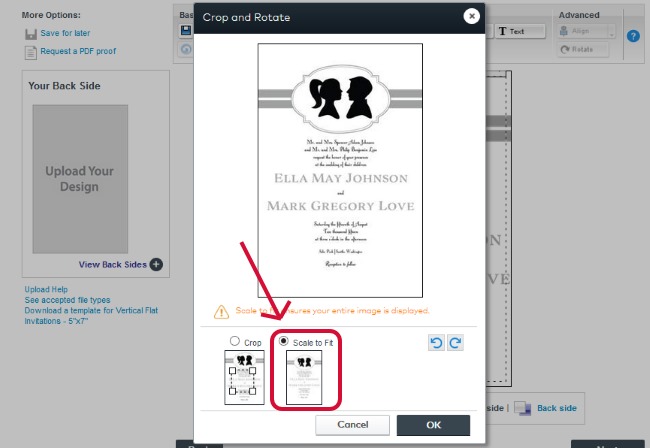
In this case we need to select Scale to Fit so that the image is shrunk down to fit inside the cut marks. Click the OK button.
Now when you return to your printable invitation you will notice that the text falls inside the safety line. Problem solved!
There are other options you can play around with including adding an image, additional text, or adding a back side design to make your PDF printable double sided. I won’t get into these functions now and will save that for another article. Click NEXT and move on to the customize back side screen.
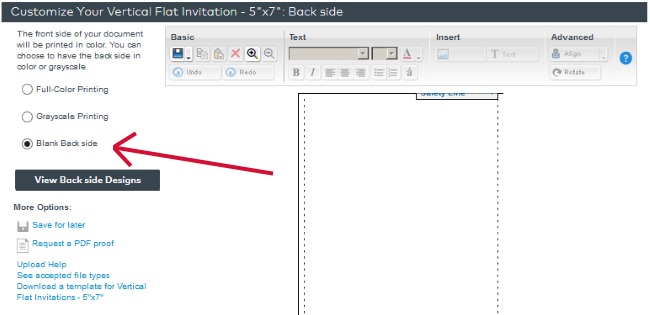
I simply select Blank Back side (above), as I don’t want to have anything on the back for this example wedding invitation. Again, feel free to add a back side if you prefer.
Request A PDF Proof
Before we click next and move on to the review function in Vistaprint I want to take a second to highlight the Request a PDF Proof option. You will notice just below the Blank Back side radio button is a link to Request a PDF proof. Click that link.
A dialog box pops up in the middle of your screen that reads, “You’ll receive a PDF proof of your design to review. We will alert you by email when your proof is ready. PDF proofs are available at no additional charge.” Simply click OK and wait for the PDF proof to be created.
Eventually you will get to the screen below where you can click to open a copy of your PDF document with the watermark ‘PROOF’.
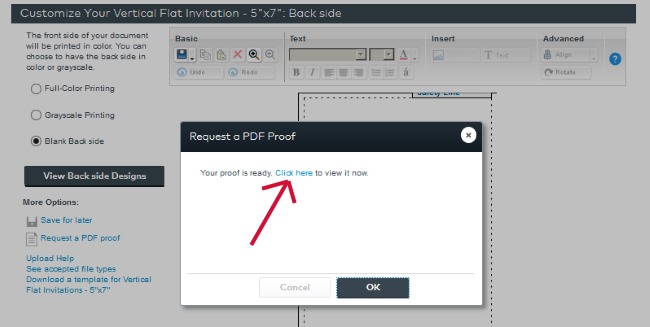
We are finished with our online proof so let’s click OK and then NEXT to move on to the review function.
[av_hr class=’short’ height=’50’ shadow=’no-shadow’ position=’center’ custom_border=’av-border-thin’ custom_width=’50px’ custom_border_color=” custom_margin_top=’30px’ custom_margin_bottom=’30px’ icon_select=’yes’ custom_icon_color=” icon=’ue808′ font=’entypo-fontello’ av_uid=’av-255kkav’ custom_class=” admin_preview_bg=”]
Review Your Design
[av_hr class=’short’ height=’50’ shadow=’no-shadow’ position=’center’ custom_border=’av-border-thin’ custom_width=’50px’ custom_border_color=” custom_margin_top=’30px’ custom_margin_bottom=’30px’ icon_select=’yes’ custom_icon_color=” icon=’ue808′ font=’entypo-fontello’ av_uid=’av-1lv8umf’ custom_class=” admin_preview_bg=”]
The final step before payment is to review your design and make sure it looks the way you want. Vistaprint reminds you to check your design and make sure:
- Information is accurate and spelled correctly
- Text is legible and contrasts against background
- Images are clear and not blurry
- Nothing is too close to the margins
We have already done the online proof, so we can check the box that says, “Online Proof Approval I have checked for the above issues and approve my design.”
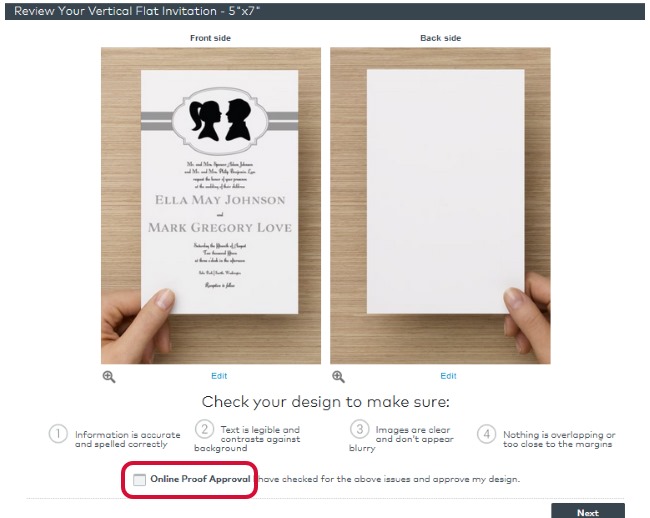
I complete my final review and everything looks good in my example silhouette invitation. Time for the checkout process.
[av_hr class=’short’ height=’50’ shadow=’no-shadow’ position=’center’ custom_border=’av-border-thin’ custom_width=’50px’ custom_border_color=” custom_margin_top=’30px’ custom_margin_bottom=’30px’ icon_select=’yes’ custom_icon_color=” icon=’ue808′ font=’entypo-fontello’ av_uid=’av-1a79ohz’ custom_class=” admin_preview_bg=”]
Checkout Process
[av_hr class=’short’ height=’50’ shadow=’no-shadow’ position=’center’ custom_border=’av-border-thin’ custom_width=’50px’ custom_border_color=” custom_margin_top=’30px’ custom_margin_bottom=’30px’ icon_select=’yes’ custom_icon_color=” icon=’ue808′ font=’entypo-fontello’ av_uid=’av-mgdcyv’ custom_class=” admin_preview_bg=”]
Step One: Complete Your Order
Quantity – As you can see from the three slides below, I’m going with a quantity of 100 for my invitations and received a nice discount.
Paper Stock – I chose the included matte finish for this invitation. Upgrade prices are reasonable if you prefer a thicker and heavier weight paper or glossy paper type. Click the link Which stock is right for me? for a good comparison chart outlining each paper type.
Envelopes – Lastly, I picked the free white envelopes. They are a standard thin envelopes, not the best option if you envision an elegant stationery set mailed to your guests. For invitations in particular I would suggest ordering envelopes from somewhere else.
[layerslider id=”3″]
Step Two: Recommended For You
Some of the recommended products are actually a bit funny. I couldn’t imagine getting a large car door magnet and having my wedding invitation plastered on the side of my car for all to see! Nonetheless, you may want to browse and add a little something extra to your cart. I love my morning coffee, maybe a coffee mug might not be a bad idea after all.
Click NEXT and you are at the last screen. I promise!
Step Three: Checkout
The My Cart page provides a final overview of all the options and extras you selected in the guide above. In this case you can see I have my example 100 matte finish silhouette invitations with free white envelopes. Your final checkout overview page will likely look different than mine.
Promotional Code
Don’t forget to add a promotional code if one is not already applied. There is often some sort of sale or deal from Vistaprint. If you signed up for their newsletter in the initial account registration, then you likely have a promo code waiting in your email inbox.
[av_hr class=’short’ height=’50’ shadow=’no-shadow’ position=’center’ custom_border=’av-border-thin’ custom_width=’50px’ custom_border_color=” custom_margin_top=’40px’ custom_margin_bottom=’40px’ icon_select=’yes’ custom_icon_color=” icon=’ue808′ font=’entypo-fontello’ custom_class=” admin_preview_bg=” av_uid=’av-nn6fd3′]
Phew! We made it to checkout, good job! It seems like a lot of screens to get to the end, but some are not applicable and you can easily move forward to finish ordering your wedding stationery.
I think you can take it from here. Most people I know have experience completing an online transaction, and Vistaprint’s checkout process is no different: choose your shipping option, enter your contact details, payment details, and then finalize your order.
I hope this tutorial has shown you how to you can use Vistaprint to upload a printable file and create your wedding stationery.
[av_hr class=’short’ height=’50’ shadow=’no-shadow’ position=’center’ custom_border=’av-border-thin’ custom_width=’50px’ custom_border_color=” custom_margin_top=’40px’ custom_margin_bottom=’40px’ icon_select=’yes’ custom_icon_color=” icon=’ue808′ font=’entypo-fontello’ custom_class=” admin_preview_bg=” av_uid=’av-nn6fd3-1′]






Leave a Reply