Supplies You Will Need:

- Wooden Letters (Michaels has a good selection)
- Paint (What ever color glitter you choose, you should choose the same paint color)
- 1 Paint Brushes
- 1 Can of Glitter (Any Color)
- Cardboard Box
- Adhesive Spray
Instructions:
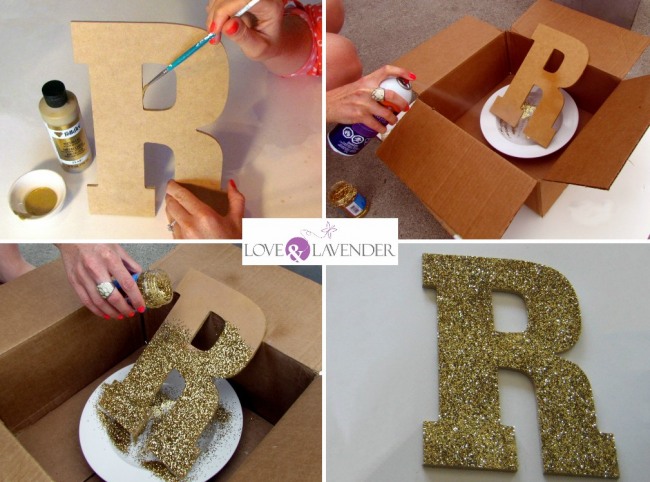
Step 1: Paint areas of the letter that you think the glitter may not stick to. I was really only trying to glitter the surface area, so I painted the edges to make them look complete.
Step 2: In a well ventilated area, take your adhesive glue and spray your letters. You can use a cardboard box as a catch all for any extra.
Tip: I also used a plate thinking that it would be an easy way to catch all the glitter, but in the end all the glitter simply stuck to the plate. I suggest just sticking to your cardboard box.
Step 3: Fairly quickly after spraying, grab your glitter and sprinkle them all over the letter. Shake the letter off and then let dry. These buggers are delicate and will lose glitter as you go, so try not to move the letters too much. You may need to touch up portions of a letter.

I was thrilled with the outcome of my DIY glitter letters. Not only did it give a pop to the table, it let everyone know where the bar was! These types of letter come in all sorts of sizes and thicknesses. I went for the super slim variety because they were on sale. The only issue was they would not stand up on their own. I ended up getting a wooden board, painting it black and gluing the letter to the board. That way I knew the letters were secure and I didn’t have to worry about the letters tipping over or knocking something off the bar table.
See DIY glitter letters at my wedding in the picture below!

Photos captured by Love & Lavender
Don’t forget to pin this to your Wedding Decor Board for later!