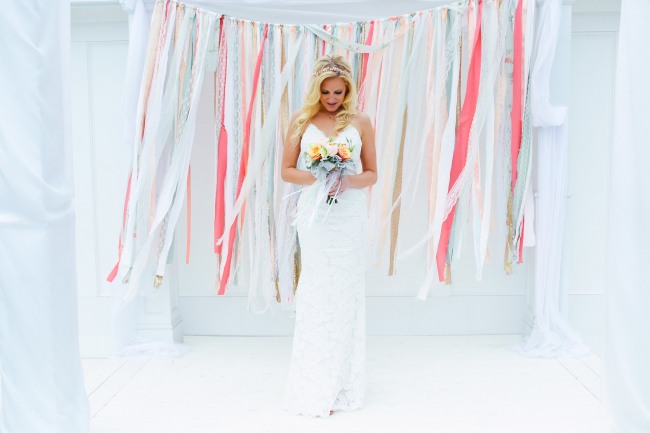
Yesterday we received a request from a reader who was interested in finding out how to make a ribbon wedding ceremony backdrop, which L&L featured in a couple real weddings a few weeks ago.
 Pin
Pin Pin
Pin
With the gratefulness of modern technology (and our Rolodex) we were able to find a beautiful and easy wedding ceremony backdrop tutorial by the lovely Michaela from Michaela Noelle Designs – a design and lifestyle blog about whatever is lovely!
Sounds like our kind of girl. She has graciously let us feature her work on the blog to help all you brides that want to add this look to your own wedding day!
 Pin
Pin
Comments from Michaela: “My cousin got married last March and her wedding was a gorgeous mix of blush pink, mercury glass, metallic finishes, luscious flowers and pretty, eclectic details. She wanted to have a photo booth in one corner of the reception for guests to play around with, so we decided to create the backdrop ourselves. With about 20 yards of various shades of pink, gray and cream ribbon, we did just that!”
Backdrop: How We Did It
Materials: Glue gun, ribbon, cord, lace, rope or a strong pipping (to attach all your ribbon to), tape measure, and scissors.
- Use a tape measure to measure how wide you want your ribbon backdrop to span. We made ours 6ft wide by 5ft long because we figured that was large enough for a few people to fit into one photo frame.
- Cut your strips of ribbon and lace and lay them out in the pattern you want to glue them in. I suggest this because we realized we bought about 10 rolls of ribbon we weren’t going to need– back to the store they went!
- Wrap the top of the ribbon around the cord. We chose a sturdy white cord typically used for trim. It’s the perfect weight to hold all this ribbon. We wanted to be able to adjust the positioning of the ribbon on the day of (in case anything needed to be fixed due to travel), so we made the ribbon wrap around the cord which enables it to be slid right or left, similar to a curtain panel on a rod.
- Continue gluing the ribbon until you reach the end of the cord. Leave about 8 inches on either end so you can easily tie the ribbon backdrop wherever you need to attach it.
 Pin
Pin Pin
Pin Pin
Pin Pin
Pin“We were so excited about how it turned out and couldn’t wait to use it for her for her shower, wedding photo booth and another friend’s shower last June! Always good to suck the life out of a project, right?!”
 Pin
Pin Pin
Pin






Pingback: Bunte DIY Ribbon Hochzeit Zeremonie Kulisse | Undbraut.com
Pingback: Bricolaje: 10 fondos de bricolaje – Maestro de ceremonias | www.tubodasoñada.es